# 포건시 플러그인 예제 - LayDate

## Content


## LayDate 소개

LayDate는 예쁜 모양의 달력을 웹에서 사용할 수 있도록 제작된 JavaScript 도구입니다. 이 페이지에서는 JavaScript 도구를 포건시에서 사용하는 플러그인을 만드는 방법을 소개하려 합니다.

향후 이 페이지에서는 이 JavaScript를 「LayDate」라 칭하고, Forguncy Plugin은 「LayDate달력」이라 호칭하겠습니다.

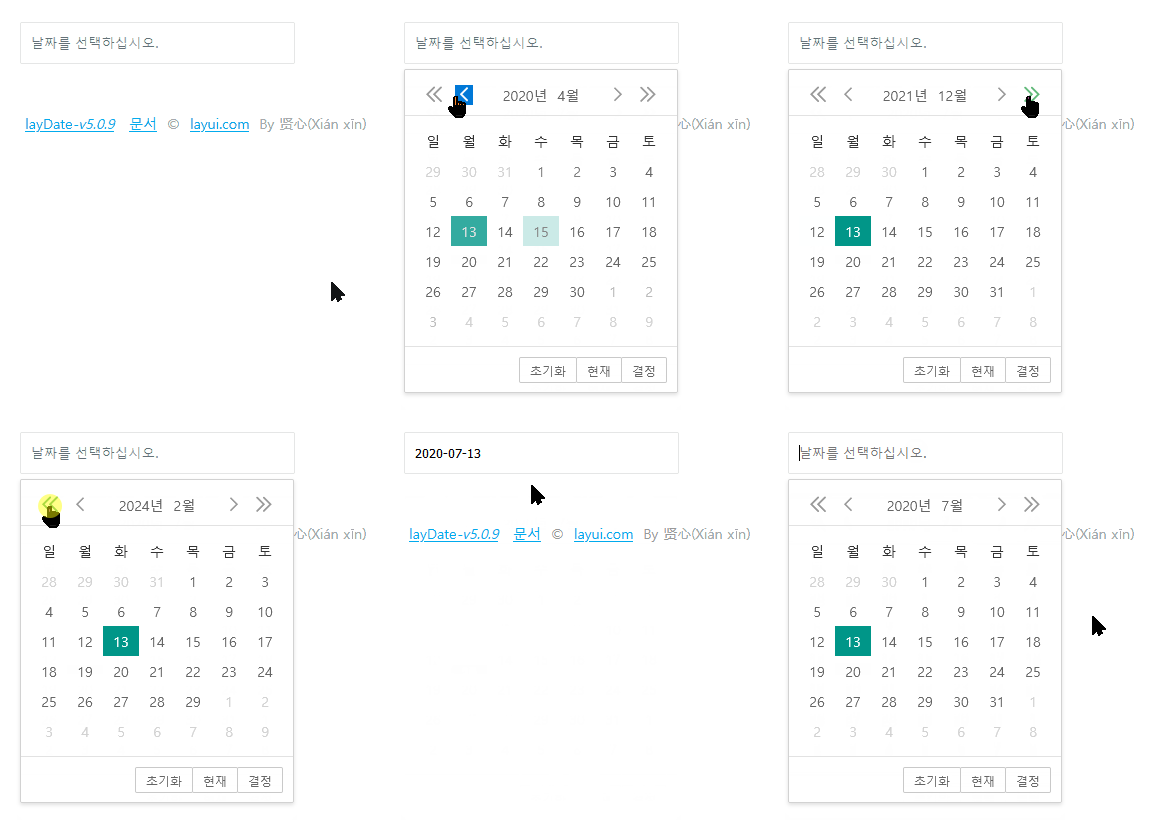
공식 홈페이지에서 다운로드 받은 layDate-v5.0.9를 실행했을 때 실제 작동하는 방식은 아래와 같습니다. ![](https://forguncy-korea.github.io/images/forguncy5/forguncy5_plugins_dev_laydate08.gif)\
<br>

### LayDate 라이선스 정보

LayDate는 중국에서 제작되었으며, MIT License로 제공되는 오픈소스입니다. 라이선스와 관련한 자세한 내용은 해당 홈페이지에서 확인해 주세요.

제작자의 공식 홈페이지는 [https://www.layui.com](https://www.layui.com/)입니다. 해당 홈페이지로 이동하시면 오픈소스 도구의 Git Repository, 활용 예제, 문서 등을 보실 수 있습니다. 중국어로만 제공됩니다.


### LayDate달력 플러그인 제작하기

1. [포건시 플러그인 생성 도구 다운로드](https://forguncy-korea.github.io/attached_files/Plugin_Files/etc/PluginTools_20200710.zip)하신 뒤 압축을 풀고, ForguncyPluginCreator.exe를 실행하십시오.<br>
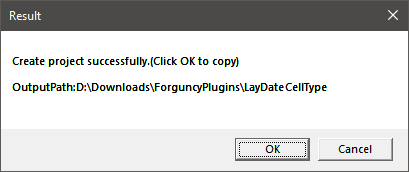
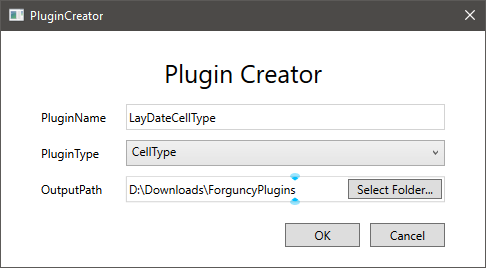
2.  프로젝트 이름(Project Name)은 ‘LayDateCellType’으로 정의하시고, 플러그인 유형(PluginType)은 ‘셀 유형(CellType)’, 출력 경로(Output Path)는 플러그인을 작업하실 경로로 입력해 주십시오.<br>

    ![](https://forguncy-korea.github.io/images/forguncy5/forguncy5_plugins_dev_laydate02.png)

    <br>

    ![](https://forguncy-korea.github.io/images/forguncy5/forguncy5_plugins_dev_laydate01.png)
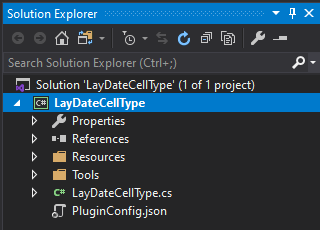
3.  플러그인 개발 환경을 생성하신 위치에서 .csproj 파일을 더블 클릭하시면 Visual Studio에서 프로젝트가 열립니다.<br>

    <br>

    ![](https://forguncy-korea.github.io/images/forguncy5/forguncy5_plugins_dev_laydate03.png)
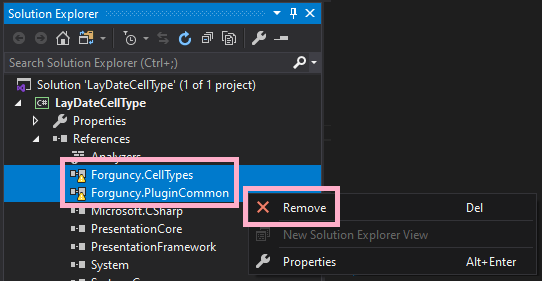
4.  VS의 솔루션 탐색기(Solution Explorer)에서 “참고”를 확장하신 후, 나타나는 Forguncy.CellTypes 및 Forguncy.PluginCommon을 제거하십시오.<br>

    <br>

    ![](https://forguncy-korea.github.io/images/forguncy5/forguncy5_plugins_dev_laydate04.png)
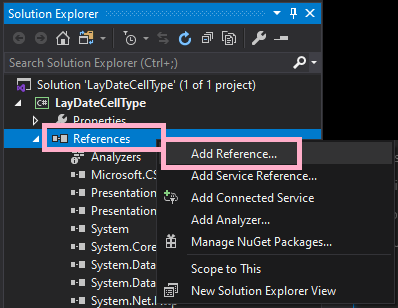
5.  다시 솔루션 탐색기의 “참조”에서 마우스 오른쪽 클릭하여 “참조 추가(Add Reference)”를 선택하십시오.<br>

    <br>

    ![](https://forguncy-korea.github.io/images/forguncy5/forguncy5_plugins_dev_laydate05.png)
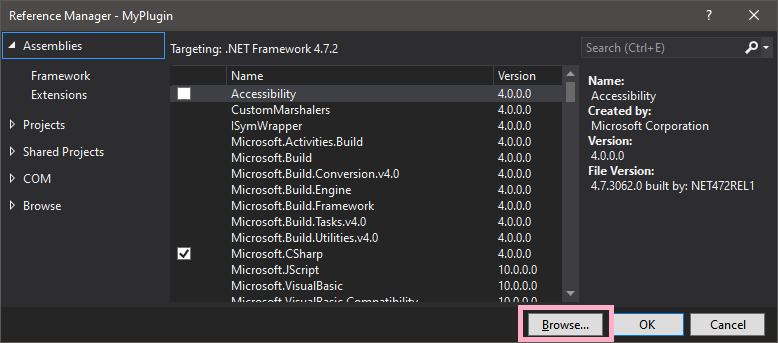
6.  “참조 추가”창의 하단에 있는 “찾아보기(Browse…)”을 클릭하신 후, 포건시 설치 폴더의 Website\bin 폴더로 이동하십시오.\
    예를 들면, C:\Program Files (x86)\Forguncy\Website\bin 입니다.<br>

    <br>

    ![](https://forguncy-korea.github.io/images/forguncy5/forguncy5_plugins_dev_11.png)
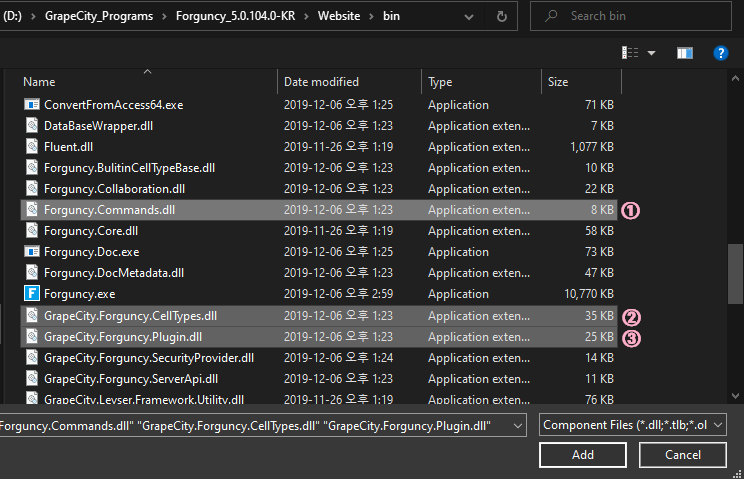
7.  포건시 설치 위치에서 3개의 라이브러리 파일 GrapeCity.Forguncy.Plugin.dll, GrapeCity.Forguncy.CellTypes.dll, Forguncy.Commands.dll을 찾아 솔루션 탐색기에 추가하십시오.<br>

    <br>

    ![](https://forguncy-korea.github.io/images/forguncy5/forguncy5_plugins_dev_12.png)
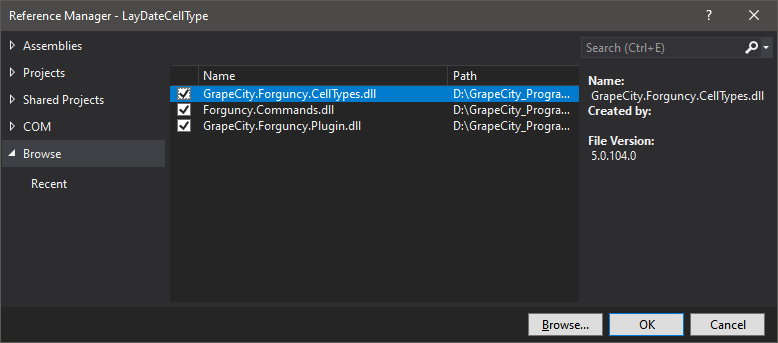
8.  해당 라이브러리 파일들을 추가하시려면 화면에서 OK를 눌러 진행하십시오.<br>

    <br>

    ![](https://forguncy-korea.github.io/images/forguncy5/forguncy5_plugins_dev_laydate06.png)
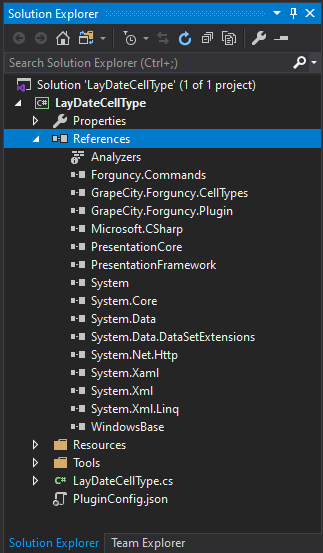
9.  파일 3개를 추가한 솔루션 탐색기의 모습은 다음과 같습니다.<br>

    <br>

    ![](https://forguncy-korea.github.io/images/forguncy5/forguncy5_plugins_dev_laydate07.png)
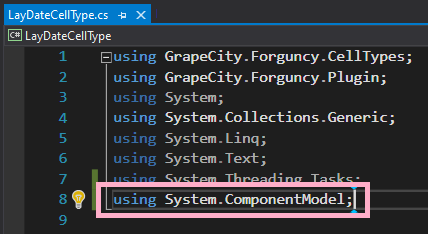
10. LatDateCellType.cs을 열어 상단의 using 부분을 확인합니다. 포건시에서 가져온 파일을 가져오면 아래 그림과 같이 자동으로 등록이 됩니다. 이번 플러그인을 위해서는 System.ComponentModel을 추가하고 진행하겠습니다.<br>

    <br>

    ![](https://forguncy-korea.github.io/images/forguncy5/forguncy5_plugins_dev_laydate13.png)
11. LayDateCellType.cs를 열어 아래와 같이 편집합니다.

    ```
    //포건시 셀유형 선택 시 왼쪽에 표시할 아이콘의 모양을 정의하는 부분입니다.
    [Icon("pack://application:,,,/LayDateCellType;component/Resources/Icon.png")]

    //셀에 표시할 기본값, 셀의 표시 모드의 선택, IReferenceFormular 등을 구현합니다.
    public class LayDateCellType : CellType, ISupportStyleInitialize, IReferenceFormula
    {
        //포건시 셀유형 선택 목록에 표시되는 이름을 정의합니다.
        public override string ToString()
        {
            return "LayDate달력";
        }

        //포건시에서 셀유형 선택 시 오른쪽 패널에 나타날 옵션1을 정의합니다.
        [DisplayName("기본값")]
        [FormulaProperty]
        public object DefaultValue
        {
            get;
            set;
        }

        //포건시에서 셀유형 선택 시 오른쪽 패널에 나타날 옵션2를 정의합니다.
        [DisplayName("모드선택")]
        public LayDateMode LayDateMode
        {
            get;
            set;
        }
          
        //셀을 병합할 때 테두리가 남도록 합니다.
        public override DisplayBehaviour DisplayBehaviour
        {
            get
            {
                return DisplayBehaviour.KeepBorderWhenMerge;
            }
        }

        public Dictionary<StylePropertyName, object> GetDefaultStyleInfos(ICellInfo cellInfo)
        {
            var styles = new Dictionary<StylePropertyName, object>();
            //LayDateCellType은 오른쪽 정렬이 기본입니다.
            styles.Add(StylePropertyName.HorizontalAlignment, ForguncyCellHorizontalAlignment.Right);
            return styles;
        }

        public IEnumerable<LocatedObject<object>> GetFormulaReferObjects(LocationIndicator location)
        {
            yield return new LocatedObject<object>(this.DefaultValue, location.AppendProperty("기본값"));
        }
    }

    //포건시에서 셀유형 선택 시 오른쪽 패널에 나타날 옵션2의 값들을 정의합니다.
    public enum LayDateMode
    {
        [Description("날짜")]
        Date,
        [Description("시간")]
        Time,
        [Description("날짜와 시간")]
        DateTime
    }
    ```
12. 다음 단계로는 웹에서 표현할 수 있는 JavaScript 작업을 해야 합니다. [LayDate 한글화 버전 다운로드](https://forguncy-korea.github.io/attached_files/Plugin_Files/V6_LayDate/layDate-v5.0.9_KoreanTranslated.zip)하고 theme 폴더와 laydate.js 파일을 Resources 폴더에 복사하십시오.<br>

    <br>

    ![](https://forguncy-korea.github.io/images/forguncy5/forguncy5_plugins_dev_laydate09.png)
13. 솔루션 탐색기에서 Resource 폴더를 열고 laydate.js 파일을 선택하신 후, 아래 특성창에서 “출력 디렉토리로 복사”규칙을 “최신인 경우 복사”로 수정하십시오.<br>

    <br>

    ![](https://forguncy-korea.github.io/images/forguncy5/forguncy5_plugins_dev_laydate10.png)
14. PluginConfig.json 파일을 열어 아래 그림과 같이 laydate.js와 laydate.css 파일의 경로를 추가하십시오.<br>

    <br>

    ![](https://forguncy-korea.github.io/images/forguncy5/forguncy5_plugins_dev_laydate11.png)
15. 이제 Resources 폴더 안에 잇는 LayDateCellType.js에 아래의 코드를 추가해 주십시오.

    ```
    //LayDateCellType 객체를 지정합니다.
    var LayDateCellType = (function (_super) {
      __extends(LayDateCellType, _super);
      function LayDateCellType() {
        return _super !== null && _super.apply(this, arguments) || this;
      }
      LayDateCellType.prototype.OADateValue = null;

      //상위 CellTypeBase의 메소드에서 달력을 웹에 표시하는 모양을 정의합니다.
      LayDateCellType.prototype.createContent = function () {
          var self = this;
          var element = this.CellElement;
          var cellTypeMetaData = element.CellType;
          var container = $("<div id='" + this.ID + "'></div>");
          var innerContainer = $('<input type="text" id=' + this.ID + '_laydate />');

          innerContainer.css("width", element.Width);
          innerContainer.css("height", element.Height);
          innerContainer.css("box-sizing", "border-box");
          innerContainer.css("border", "0px");
          innerContainer.css("outline", "none");

          var hAlign = this.getHorizontalAlignment(element.StyleInfo);
          if (hAlign) {
              innerContainer.css("text-align", hAlign);
          }
          container.append(innerContainer);
          return container;
      }

      //셀의 좌우 정렬을 설정합니다.
      LayDateCellType.prototype.getHorizontalAlignment = function (styleInfo) {
          if (styleInfo) {
              if (styleInfo.HorizontalAlignment === Forguncy.CellHorizontalAlignment.Left) {
                  return "left";
              } else if (styleInfo.HorizontalAlignment === Forguncy.CellHorizontalAlignment.Center) {
                  return "center";
              } else if (styleInfo.HorizontalAlignment === Forguncy.CellHorizontalAlignment.Right) {
                  return "right";
              }
          }
          return null;
      }

      //셀에 선택된 값을 표시하기 위해 가져옵니다.
      LayDateCellType.prototype.getValueFromElement = function () {
          return this.OADateValue;
      }

      //셀의 선택된 값을 가져와 표시합니다.
      LayDateCellType.prototype.setValueToElement = function (element, value) {
          if (!(value instanceof Date)) {
              if (typeof (value) === "number") {
                  value = Forguncy.ConvertOADateToDate(value);
              } else {
                  try {
                      value = new Date(value);
                  } catch (e) {
                      value = null;
                  }
              }
          }
          var info = this.getDateCellTypeTypeAndFormat();
          var type = info.type;
          var format = info.format;
          if (value == null) {
              laydate.render({
                  elem: "#" + this.ID + "_laydate",
                  type: type,
                  format: format
              });
          } else {
              laydate.render({
                  elem: "#" + this.ID + "_laydate",
                  type: type,
                  format: format,
                  value: value
              });
          }
      }

      //포건시에서 기본값 설정을 했다면 상위 CellTypeBase의 메소드로부터 값을 가져와 표시합니다.
      LayDateCellType.prototype.getDefaultValue = function () {
          var cellTypeMetaData = this.CellElement.CellType;
          var defaultValue = cellTypeMetaData.DefaultValue;
          return {
              Value: defaultValue
          };
      }

      //화면에 데이터를 표시할 때 포건시의 '표시 형태 선택'에서 설정한 방식으로 표시합니다.
      LayDateCellType.prototype.onLoad = function () {
          var info = this.getDateCellTypeTypeAndFormat();
          var type = info.type;
          var format = info.format;
          var self = this;
          laydate.render({ //laydate.js 라이브러리에서 참조합니다.
              elem: "#" + this.ID + "_laydate",
              type: type,
              format: format,
              done: function (value, date, endDate) {
                  var newValue = Forguncy.ConvertDateToOADate(new Date(date.year, date.month - 1, date.date, date.hours, date.minutes, date.seconds));
                  if (type === "time") {
                      newValue = newValue % 1;
                  } else if (type === "date") {
                      newValue = Math.floor(newValue);
                  }
                  self.OADateValue = newValue;
                  self.commitValue(); //데이터를 화면으로 보내 표시
              }
          });
      }

      //포건시의 '표시 형태 선택'에서 설정한 날짜/시간 표시 방식을 설정합니다.
      LayDateCellType.prototype.getDateCellTypeTypeAndFormat = function () {
          var cellTypeMetaData = this.CellElement.CellType;
          var type = "date";
          var format = "yyyy-MM-dd";
          if (cellTypeMetaData.LayDateMode === LayDateMode.Time) {
              type = "time";
              format = "HH:mm:ss";
          } else if (cellTypeMetaData.LayDateMode === LayDateMode.DateTime) {
              type = "datetime";
              format = "yyyy-MM-dd HH:mm:ss";
          }
          return {
              type: type,
              format: format
          };
      }
      return LayDateCellType;
    }(Forguncy.CellTypeBase));

    //포건시 옵션 표시시 C# 데이터와 일관성을 유지하기 위해 index를 설정합니다.
    var LayDateMode = {
      Date: 0,
      Time: 1,
      DateTime: 2
    };

    //다음의 키 형태는 "Namespace.ClassName, AssemblyName"입니다.
    Forguncy.CellTypeHelper.registerCellType("LayDateCellType.LayDateCellType, LayDateCellType", LayDateCellType);
    ```
16. 다음은 포건시에서 표시할 플러그인의 아이콘을 설정하겠습니다. 포건시 플러그인 프로젝트 생성 시 기본으로 추가되는 Icon.png은 제거하시고, 새로 만든 LayDateIcon을 Resouces 폴더에 복사해 주십시오.<br>

    * 아이콘을 복사하신 다음 속성에서 “Build Action”을 “Resource”로 변경하십시오.
    * 해당 [아이콘의 출처](https://www.flaticon.com/kr/free-icon/calendar_275888)는 링크에서 확인하시면 됩니다.
    * 아이콘은 16x16 크기로 줄이셔야 포건시에서 정상적으로 출력됩니다. 이미 작업된 파일이 필요하시면 [이곳을 클릭하여 다운로드](https://forguncy-korea.github.io/attached_files/Plugin_Files/V6_LayDate/LayDateIcon.png)하십시오.<br>

    ![](https://forguncy-korea.github.io/images/forguncy5/forguncy5_plugins_dev_laydate12.png)
17. LayDateCellType.cs 파일을 열어 아이콘의 위치 지정하는 부분에 새 아이콘의 이름으로 변경해 주십시오.<br>

    <br>

    ![](https://forguncy-korea.github.io/images/forguncy5/forguncy5_plugins_dev_laydate14.png)
18. PluginLogo.png를 삭제 후 변경하고자 하시는 로고로 바꿔 주십시오.\
    ![](https://forguncy-korea.github.io/images/forguncy5/forguncy5_plugins_dev_laydate15.png)

    * 이미 작업된 파일이 필요하시면 [이곳을 클릭하여 다운로드](https://forguncy-korea.github.io/attached_files/Plugin_Files/V6_LayDate/PluginLogo.png)하십시오.

    PluginLogo.png 파일의 속성창에서 “출력 디렉터리로 복사” 규칙을 “항상 복사”로 변경하십시오.<br>

    <br>

    ![](https://forguncy-korea.github.io/images/forguncy5/forguncy5_plugins_dev_laydate16.png)
19. PluginConfig.json 파일을 열어 플러그인의 이미지 파일 이름, 플러그인 소개 설명, 플러그인 이름 등의 정보를 변경하십시오.<br>

    <br>

    ![](https://forguncy-korea.github.io/images/forguncy5/forguncy5_plugins_dev_laydate17.png)
20. 솔루션 탐색기에서 플러그인 이름을 마우스 오른쪽으로 클릭하신 후 “빌드(Build)”합니다.\
    ![](https://forguncy-korea.github.io/images/forguncy5/forguncy5_plugins_dev_laydate18.png)

    아래와 같이 빌드의 결과가 나타나면, 해당 위치로 이동하십시오.\
    ![](https://forguncy-korea.github.io/images/forguncy5/forguncy5_plugins_dev_laydate19.png)

    빌드 결과물이 나온 위치에 아래 그림과 같이 zip 파일이 나타납니다. 해당 파일을 따로 복사해서 특정 폴더에 모으셔도 되고, 해당 위치에 두셔도 됩니다.\
    ![](https://forguncy-korea.github.io/images/forguncy5/forguncy5_plugins_dev_laydate20.png)


## 포건시에서 LayDate달력 플러그인 사용하기

1.  포건시를 실행하시고 「파일 > 플러그인」으로 이동하셔서 “플러그인 설치”를 클릭합니다.<br>

    빌드 결과물이 나온 위치에 생성된 zip 파일을 불러옵니다.아래와 같이 플러그인 폴더에 추가되면 성공입니다.<br>

    <br>

    ![](https://forguncy-korea.github.io/images/forguncy5/forguncy5_plugins_dev_laydate21.png)

    ![](https://forguncy-korea.github.io/images/forguncy5/forguncy5_plugins_dev_laydate22.png)
2.  다음은 생성한 플러그인을 활용하는 방법입니다.<br>

    해당 [포건시 프로젝트 파일을 다운로드](https://forguncy-korea.github.io/attached_files/Plugin_Files/V6_LayDate/LayDate%EB%8B%AC%EB%A0%A5_%EC%98%88%EC%A0%9C.fgko)하셔서 직접 열어 보실 수 있도록 해 두었습니다. 해당 프로젝트 파일은 Forguncy v6.0 이상을 사용하셔야 합니다.<br>

    위 프로젝트를 간략히 설명하면 다음과 같습니다.\
    ① 통합 셀을 만든 뒤 “LayDate달력 셀유형” 이라고 적고, 배경색을 회색으로 칠했습니다.\
    ② 또 다른 통합 셀을 만들고, 까만색 테두리로 둘레를 표시 했습니다.\
    ③ 생성한 통합 셀의 유형을 LayDateCellType으로 지정했습니다.\
    ④ 셀의 기본 값을 오늘 날짜를 표시할 수 있도록 =TODAY()를 설정했습니다.<br>

    LayDate달력 셀유형을 활용한 프로젝트를 실행시키면 다음과 같이 나타납니다.<br>

    <br>

    ![](https://forguncy-korea.github.io/images/forguncy5/forguncy5_plugins_dev_laydate23.png)

    ![](https://forguncy-korea.github.io/images/forguncy5/forguncy5_plugins_dev_laydate24.gif)
3. 위에서 설명드린 내용은 여기 [▶LayDate달력 소스코드](https://forguncy-korea.github.io/attached_files/Plugin_Files/V6_LayDate/LayDateCellType_SourceCode.zip)를 클릭하셔서 다운로드 후 Microsoft Visual Studio에서 열어 작업하실 수 있습니다.

<br>