# Google 드라이브

## Content


Google 드라이브 용 클라우드 스토리지 제공업체를 등록하면
\
Google 드라이브에 파일 및 폴더를 만들거나 다운로드할 수 있습니다.

[GoogleDriveProvider.zip](https://gcdocumentsitekrblob.blob.core.windows.net/document-site-files/images/4e3bfc58-e2a1-41a1-ac75-a0e383260d93/GoogleDriveProvider.zip)

### Google 드라이브와의 협력 단계

1. **클라우드 스토리지 공급자 등록 사용자 계정**\
   관리 화면 또는 서버 관리 포털에 연결하여 다운로드 링크에서 구한 "Google 드라이브용 클라우드 스토리지 공급자"를 등록합니다.
2. **Google Cloud Platform에서 자격 증명 가져오기**\
   Google Cloud Platform에 연결하여 클라이언트 ID와 클라이언트 비밀을 가져옵니다.
3. **클라우드 스토리지 인증 설정**\
   사용자 계정 관리 화면 또는 서버 관리 포털에 연결하여 인증 설정을 수행합니다.


## 클라우드 스토리지 제공자 등록

1.  **사용자 계정 관리 화면 또는 서버 관리 포털에 로그인합니다.**

    * 개발 환경에서는 개발 시 사용자 계정 관리에 로그인하여 로그인합니다.
    * 배포한환경에서는 서버 관리 포털 에 따라 로그인합니다.

    다음은 프로덕션 환경인 서버 관리 포털의 화면을 사용하여 설명하지만 개발 환경에서도 마찬가지입니다.
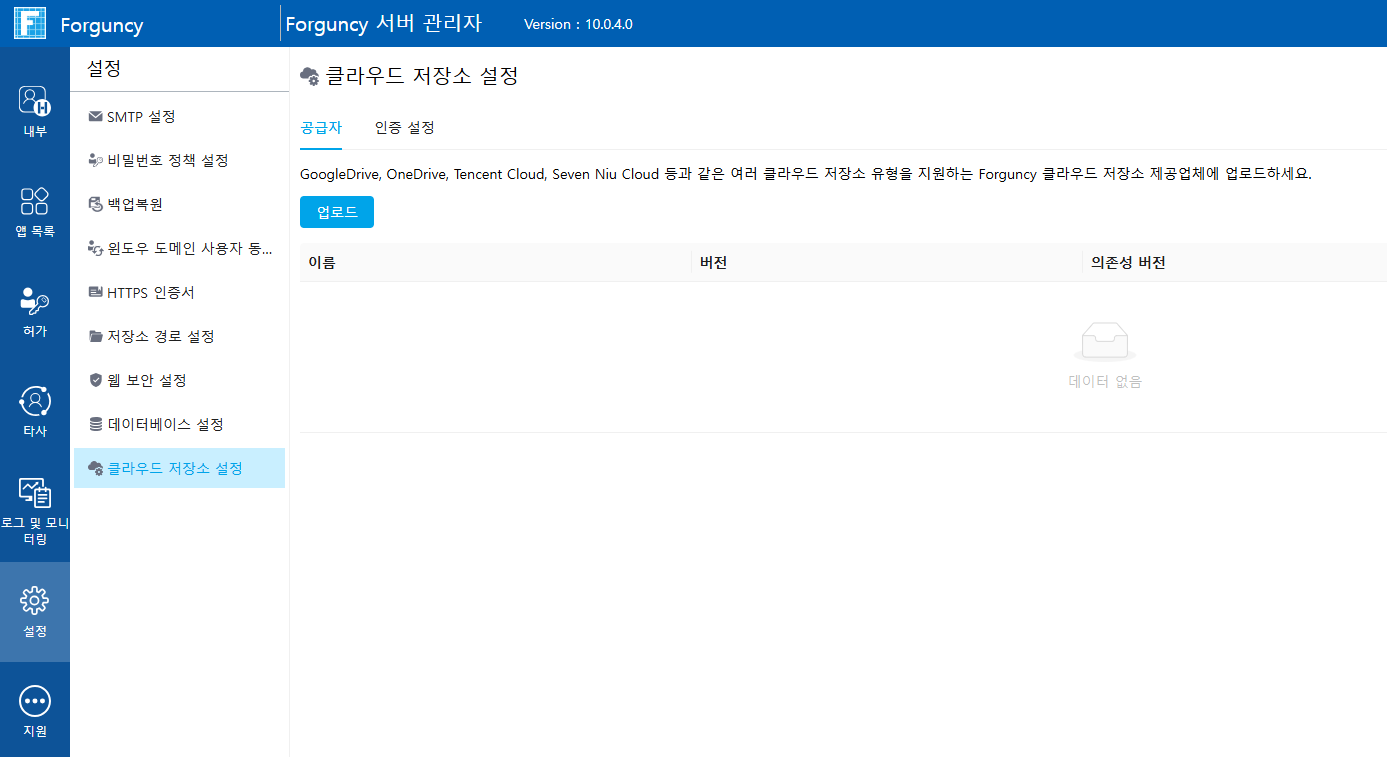
2.  **\[설정] - \[클라우드 저장소 설정]을 클릭한 후 \[업로드] 버튼을 클릭하여 다운로드한 ZIP 파일을 선택합니다.**<br>

    <br>

    ![](https://gcdocumentsitekrblob.blob.core.windows.net/document-site-files/images/4e3bfc58-e2a1-41a1-ac75-a0e383260d93/image-32.png)


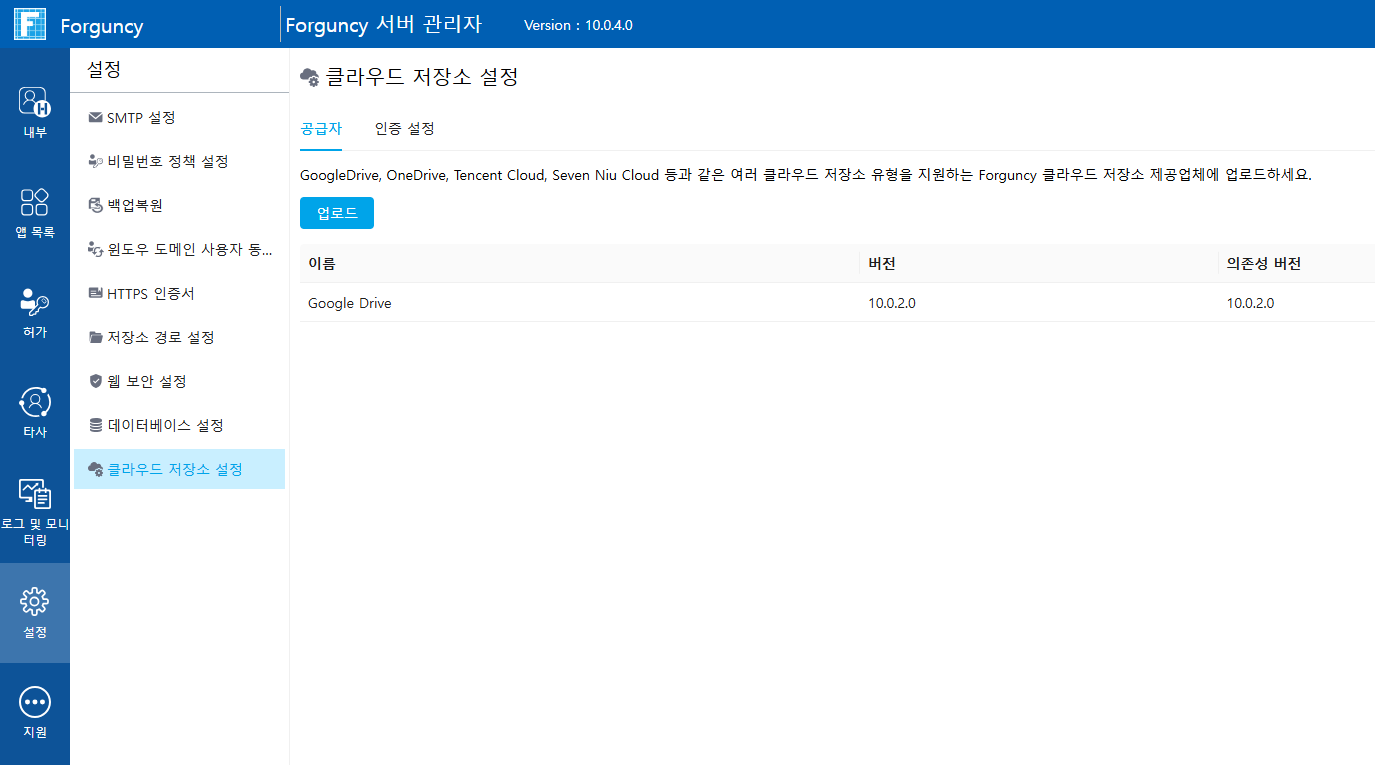
3.  등록이 완료됩니다.<br>

    ![](https://gcdocumentsitekrblob.blob.core.windows.net/document-site-files/images/4e3bfc58-e2a1-41a1-ac75-a0e383260d93/image-33.png)


## Google Cloud Platform에서 인증 정보 취득

Forguncy는 Google 드라이브와 함께 작동하기 위해 Google Cloud Platform의 Google Drive API를 사용합니다.

> 본 페이지에 게재되어 있는 Google Cloud Platform의 화면은 도움말 작성 당시의 것이며, 화면의 구성이나 순서 등은 Google Cloud Platform의 업데이트 등에 따라 바뀔 수 있는 것에 주의해 주세요.

1. **Google 계정을 준비하고 Google Cloud Platform에 로그인합니다.**
2.  **우측 상단에 있는 "콘솔"을 클릭합니다.**<br>

    ![](https://gcdocumentsitekrblob.blob.core.windows.net/document-site-files/images/4e3bfc58-e2a1-41a1-ac75-a0e383260d93/image-22.png)
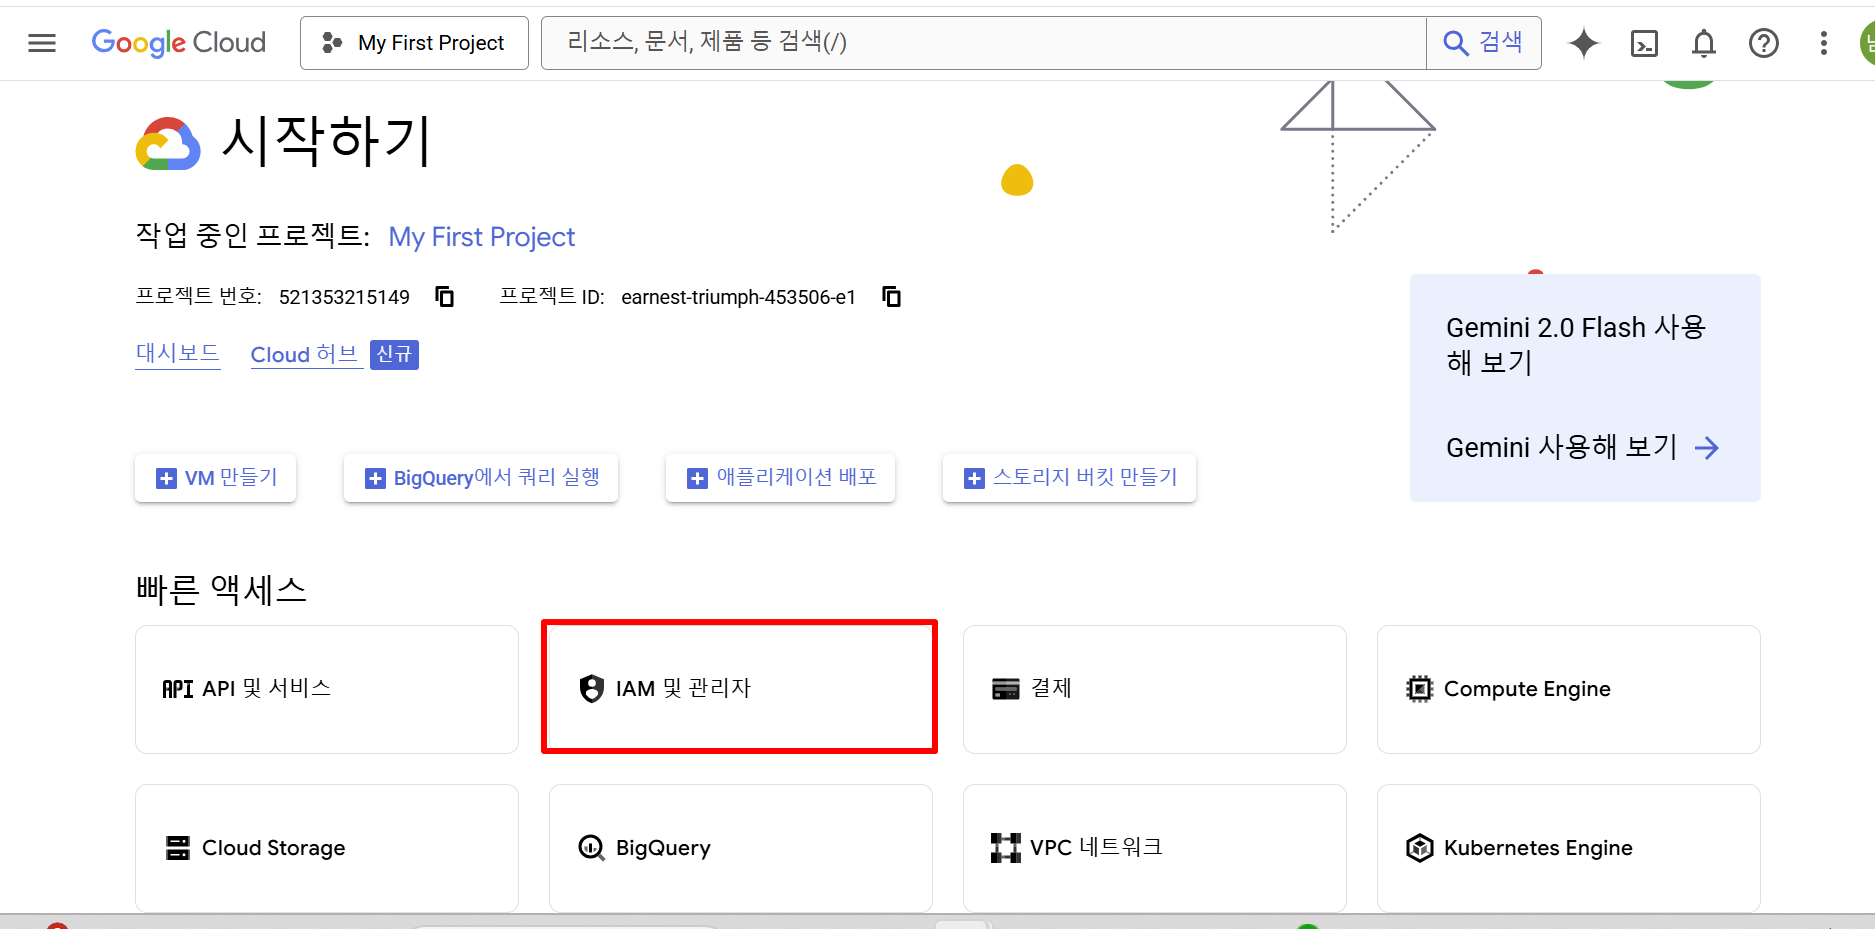
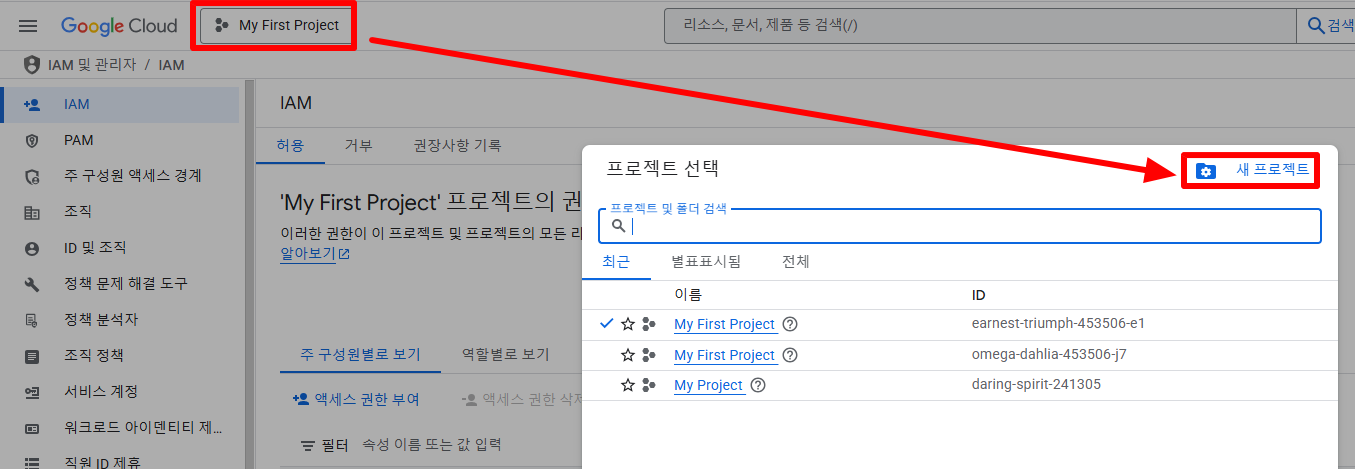
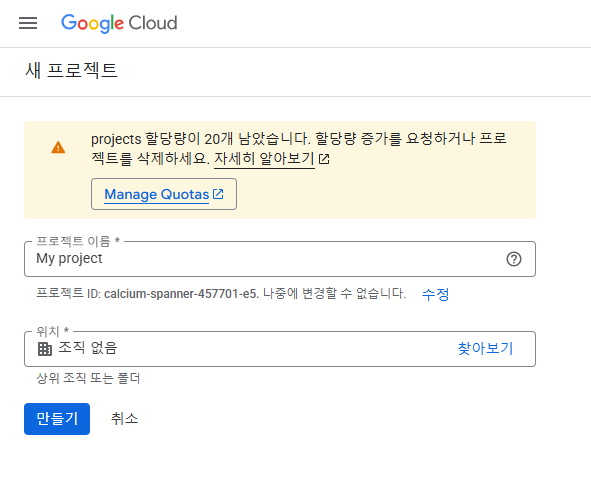
3.  **새 프로젝트를 만듭니다.**\
    (기존 프로젝트를 사용하는 경우이 단계를 건너 뜁니다.)

    메뉴에서 IAM 및 관리 > 프로젝트 만들기를 선택합니다.<br>

    ![](https://gcdocumentsitekrblob.blob.core.windows.net/document-site-files/images/4e3bfc58-e2a1-41a1-ac75-a0e383260d93/image-34.png)

    ![](https://gcdocumentsitekrblob.blob.core.windows.net/document-site-files/images/4e3bfc58-e2a1-41a1-ac75-a0e383260d93/image-35.png)


임의의 프로젝트 이름으로 프로젝트를 생성합니다.<br>

![](https://gcdocumentsitekrblob.blob.core.windows.net/document-site-files/images/4e3bfc58-e2a1-41a1-ac75-a0e383260d93/image-36.png)

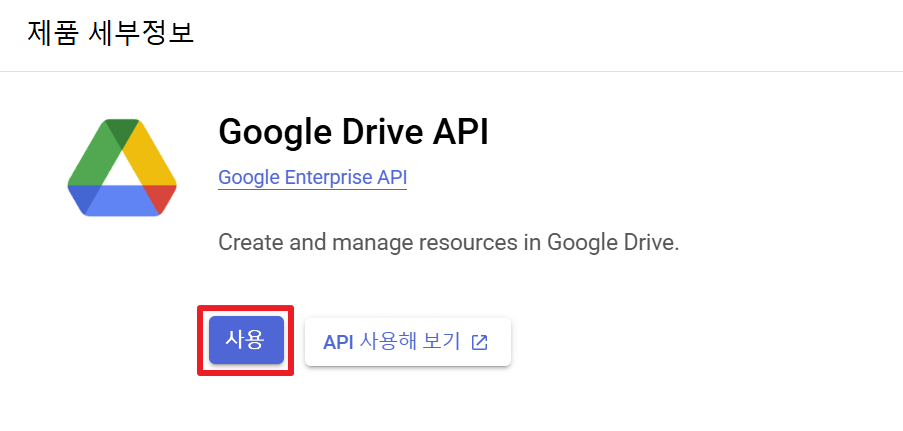
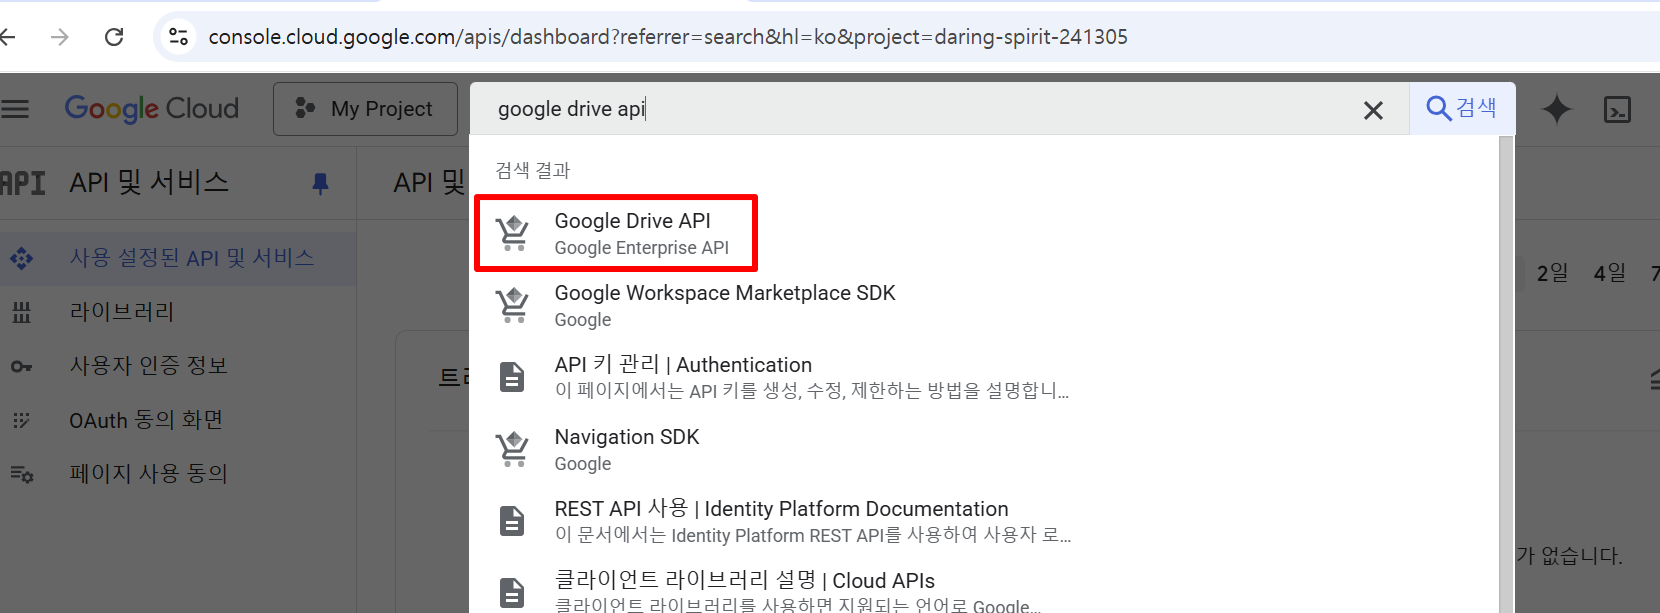
 **3. Google Drive API를 사용 설정합니다.**\
화면 상단의 검색창에 Google Drive API를 입력하고 \[Google Drive API]를 선택합니다.
![](https://gcdocumentsitekrblob.blob.core.windows.net/document-site-files/images/4e3bfc58-e2a1-41a1-ac75-a0e383260d93/image-38.png)

사용을 클릭합니다.<br>

![](https://gcdocumentsitekrblob.blob.core.windows.net/document-site-files/images/4e3bfc58-e2a1-41a1-ac75-a0e383260d93/image-39.png)

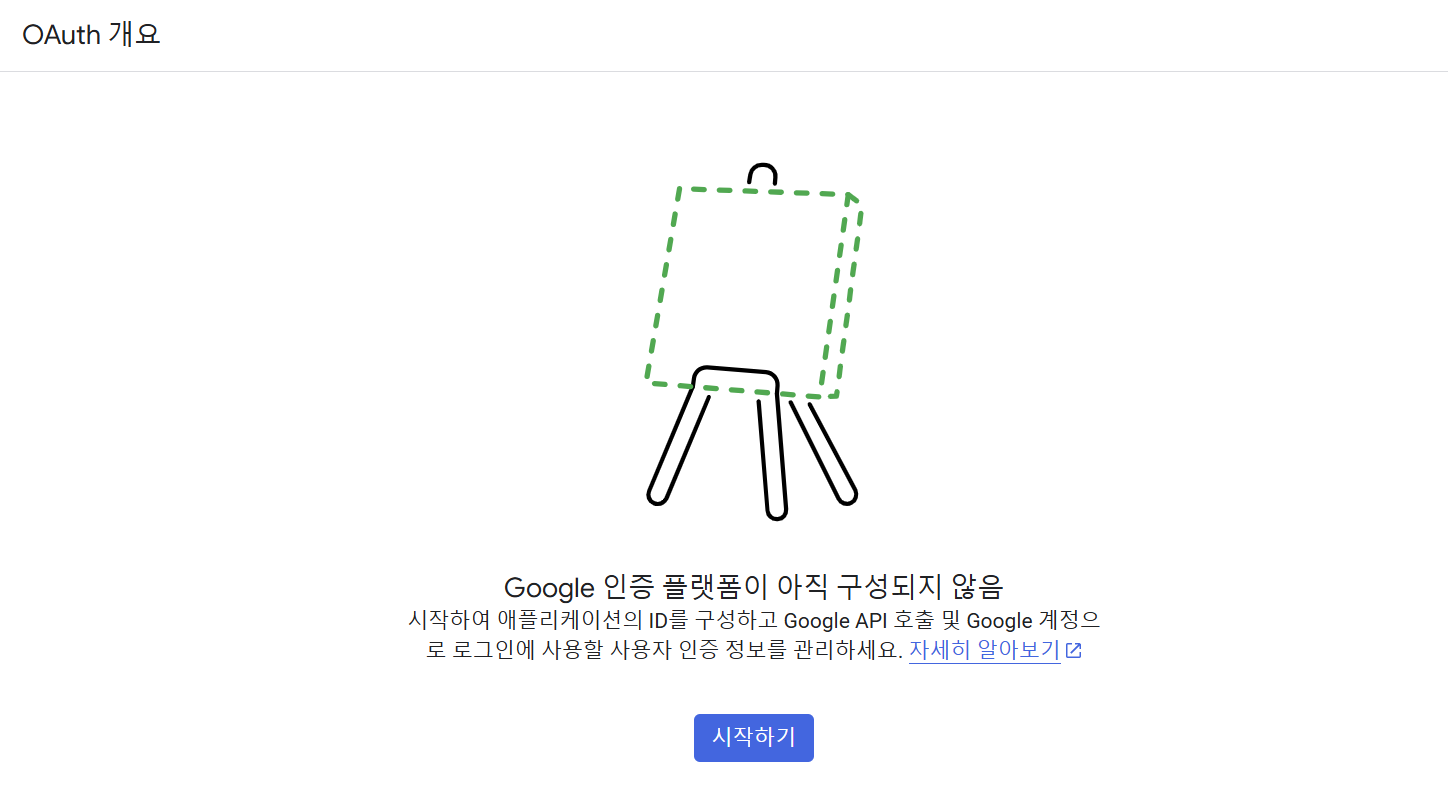
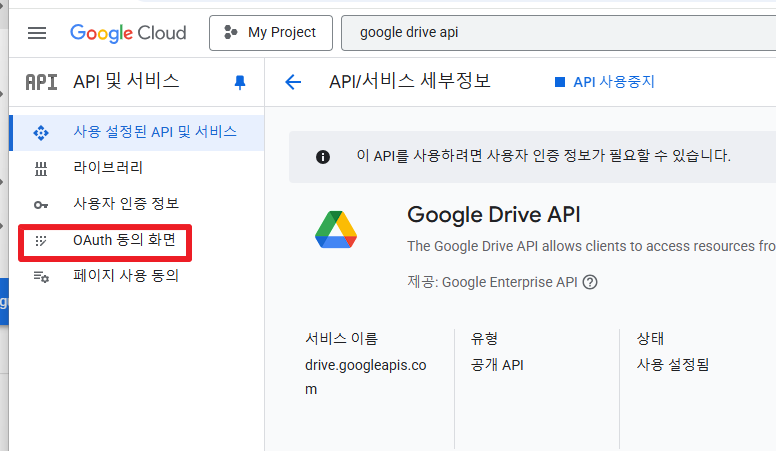
4.  **OAuth 동의 화면을 설정합니다.**

> 사용하는 Google API가 기밀성이 높은 범위에 해당하는 경우 필요한 설정입니다. 자세한 내용은 OAuth 동의 화면 페이지를 확인하십시오.
![](https://gcdocumentsitekrblob.blob.core.windows.net/document-site-files/images/4e3bfc58-e2a1-41a1-ac75-a0e383260d93/image-40.png)

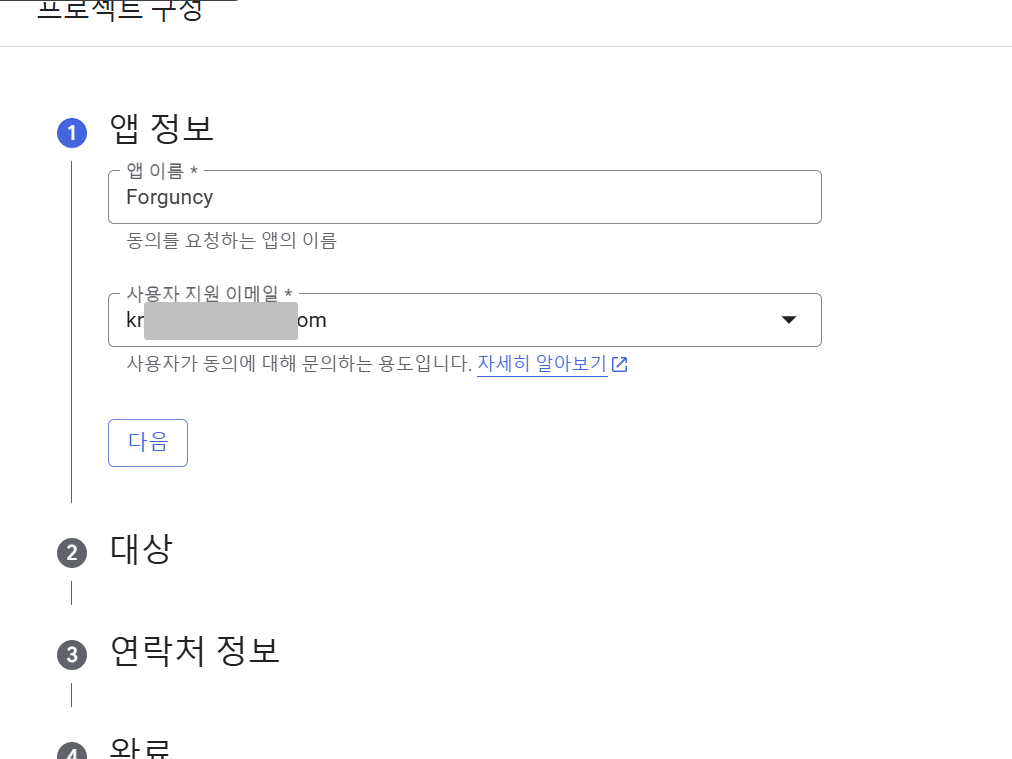
\[시작하기]를 클릭합니다.

![](https://gcdocumentsitekrblob.blob.core.windows.net/document-site-files/images/4e3bfc58-e2a1-41a1-ac75-a0e383260d93/image-2609.png)

아래 텍스트박스를 입력합니다.<br>

![](https://gcdocumentsitekrblob.blob.core.windows.net/document-site-files/images/4e3bfc58-e2a1-41a1-ac75-a0e383260d93/image-2610.png)

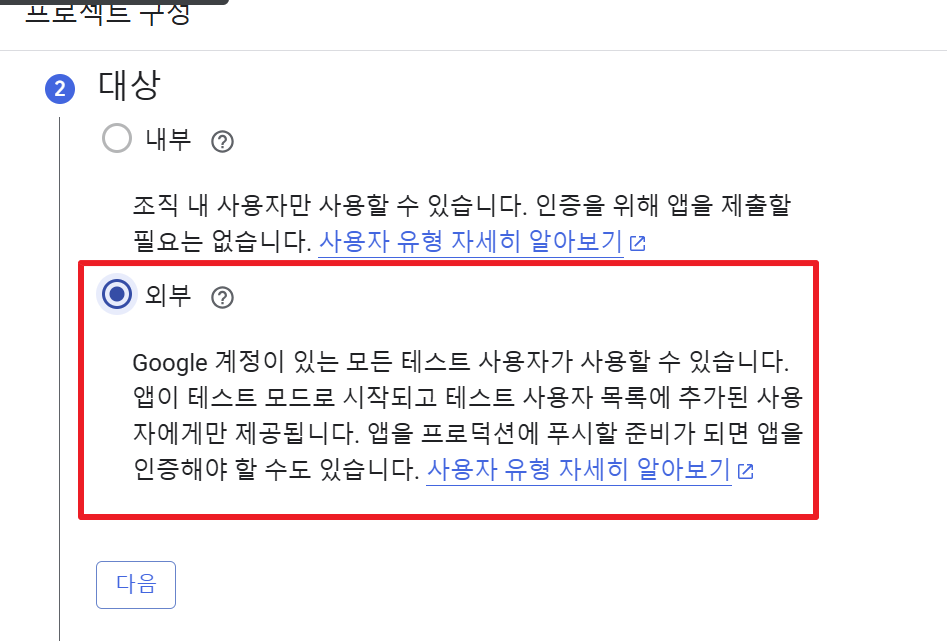
#### \[외부]를 선택합니다.

![](https://gcdocumentsitekrblob.blob.core.windows.net/document-site-files/images/4e3bfc58-e2a1-41a1-ac75-a0e383260d93/image-2611.png)

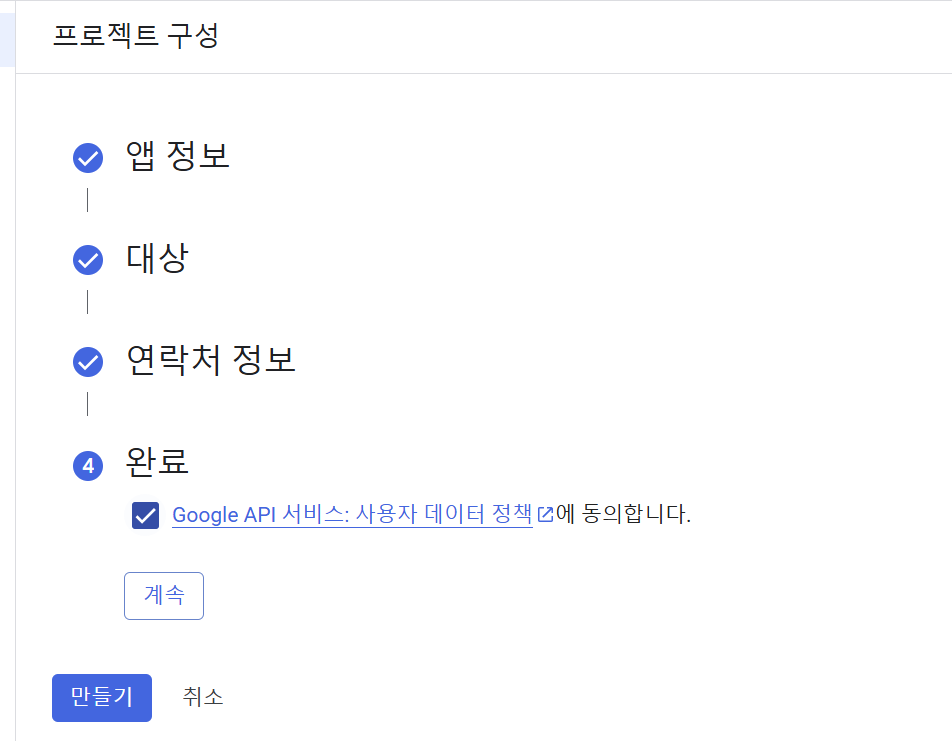
\[만들기]를 클릭합니다.

![](https://gcdocumentsitekrblob.blob.core.windows.net/document-site-files/images/4e3bfc58-e2a1-41a1-ac75-a0e383260d93/image-29.png)

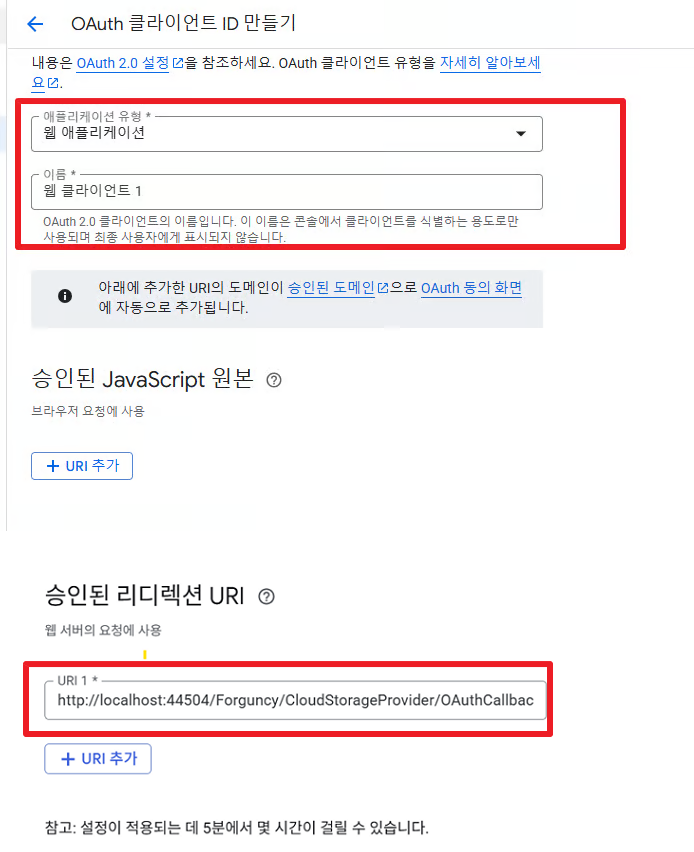
애플리케이션 유형을 "웹 애플리케이션"을 선택하고 이름을 입력합니다.

승인된 리다렉션 URI에는 아래와   같이 입력합니다. 

*   개발 시 <br>

    ```
    http: //localhost:<포트 번호>/Forguncy/CloudStorageProvider/OAuthCallback
    ```
*   운영 시 (서버 관리 포털의 경우)<br>

    ```
    https: //<도메인>:22345/UserService/CloudStorageProvider/OAuthCallback
    ```


![](https://gcdocumentsitekrblob.blob.core.windows.net/document-site-files/images/4e3bfc58-e2a1-41a1-ac75-a0e383260d93/image-23.png)

\[저장] 버튼을 클릭합니다.<br>

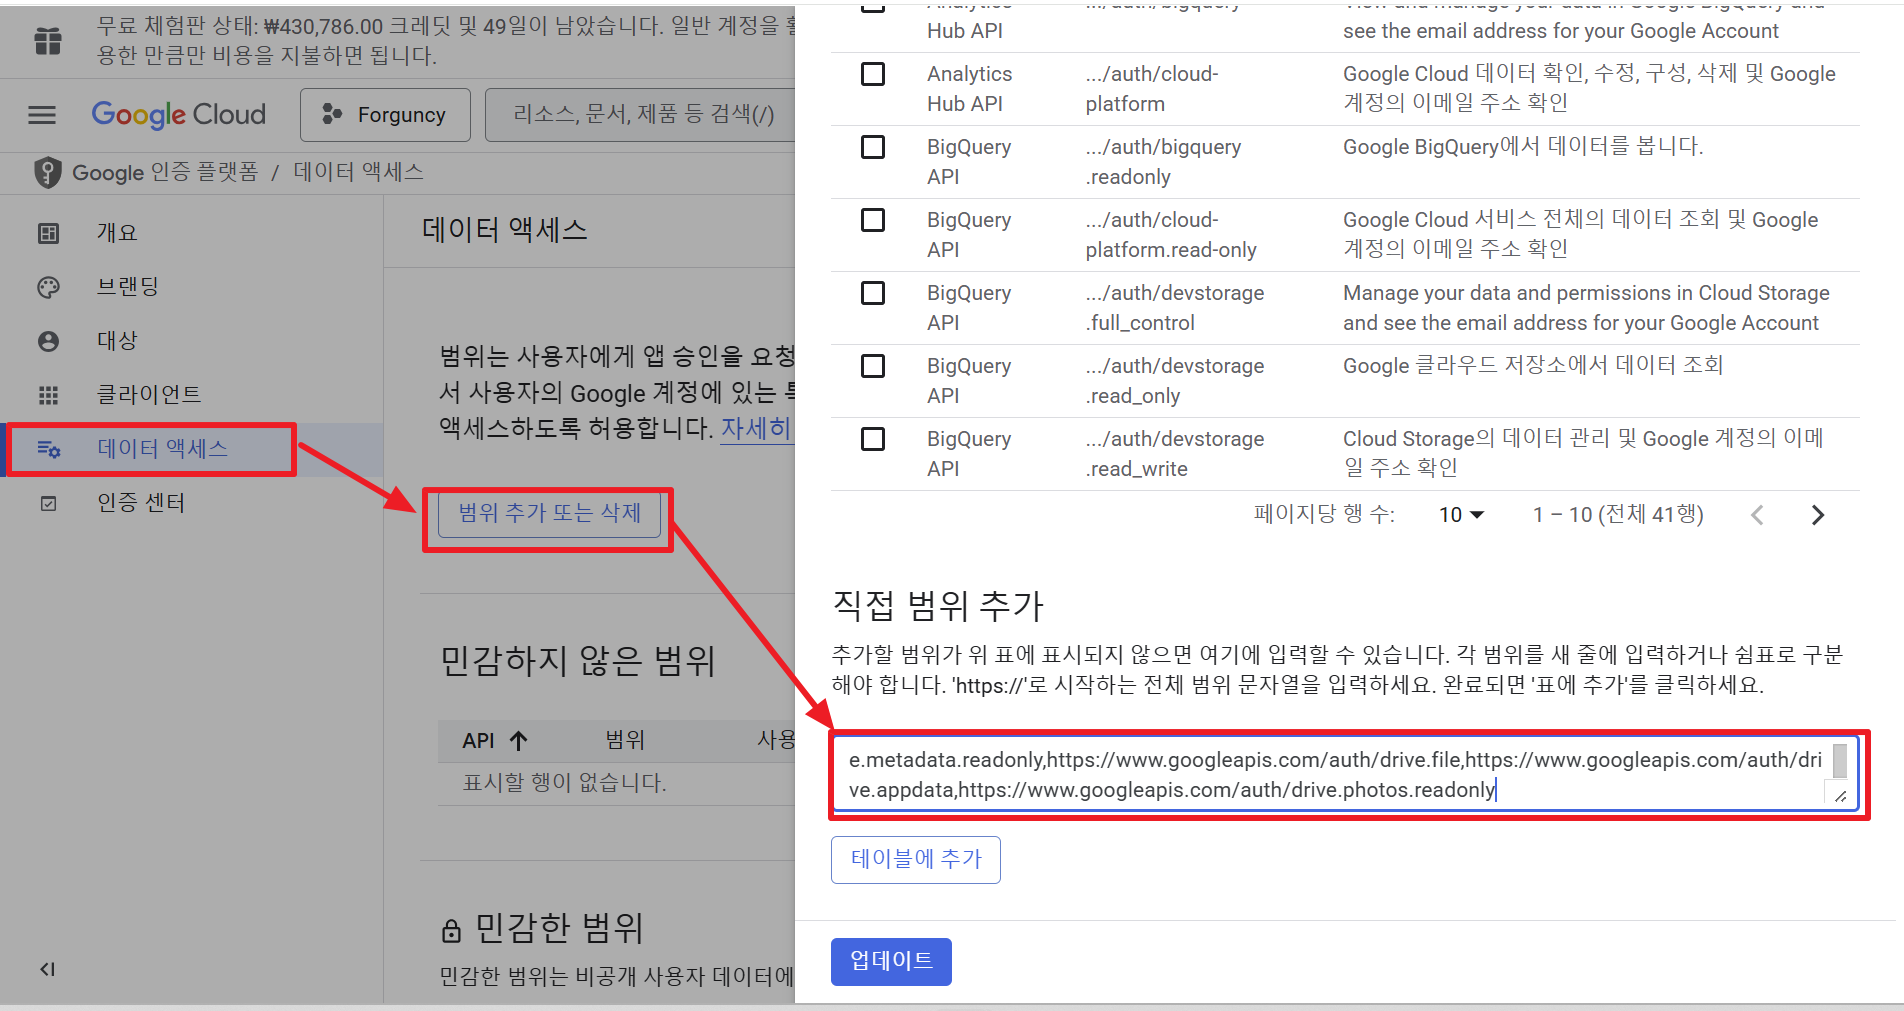
5. \[데이터 엑세스] 메뉴에서 \[범위 추가 도는 삭제] 버튼을 클릭하여 하단에 있는 직접 범위 추가에서 아래 내용을 입력합니다. 

```
https://www.googleapis.com/auth/drive,https://www.googleapis.com/auth/drive.readonly,https://www.googleapis.com/auth/drive.metadata,https://www.googleapis.com/auth/drive.metadata.readonly,https://www.googleapis.com/auth/drive.file,https://www.googleapis.com/auth/drive.appdata,https://www.googleapis.com/auth/drive.photos.readonly​

```

![](https://gcdocumentsitekrblob.blob.core.windows.net/document-site-files/images/4e3bfc58-e2a1-41a1-ac75-a0e383260d93/image-30.png)

\[업데이트]버튼을 클릭합니다. 

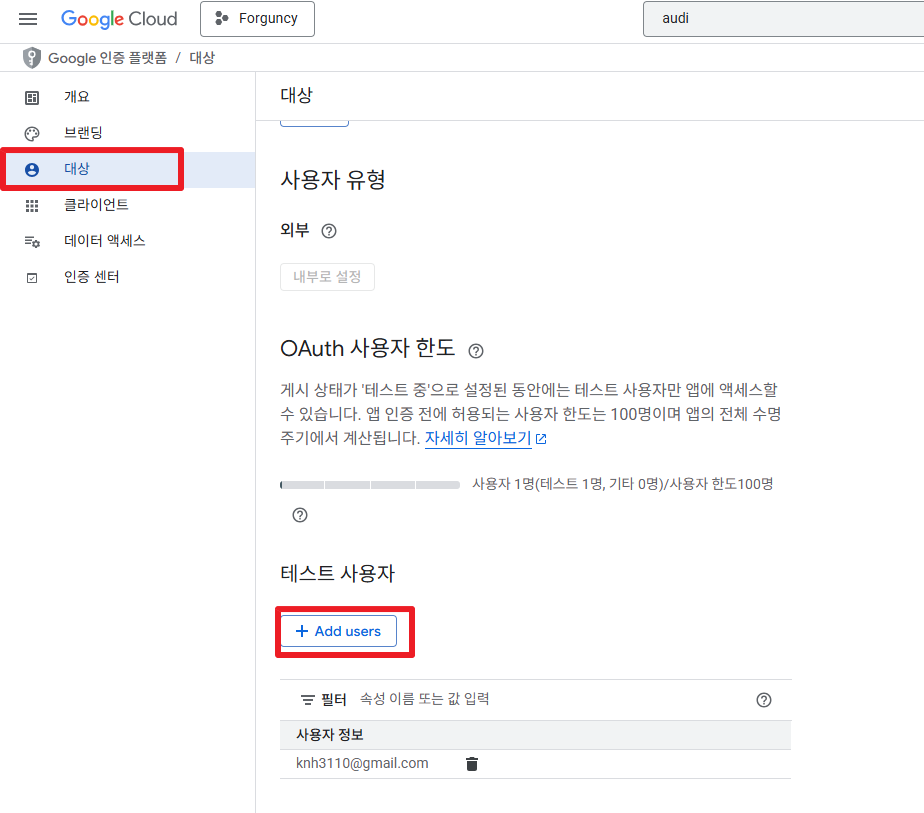
6.  메뉴에서 \[대상]을 선택 한 후, 테스트사용자를 추가합니다.   \
    <br>

    ![](https://gcdocumentsitekrblob.blob.core.windows.net/document-site-files/images/4e3bfc58-e2a1-41a1-ac75-a0e383260d93/image-24.png)


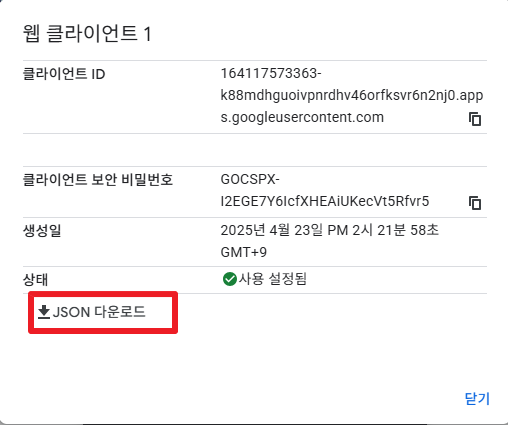
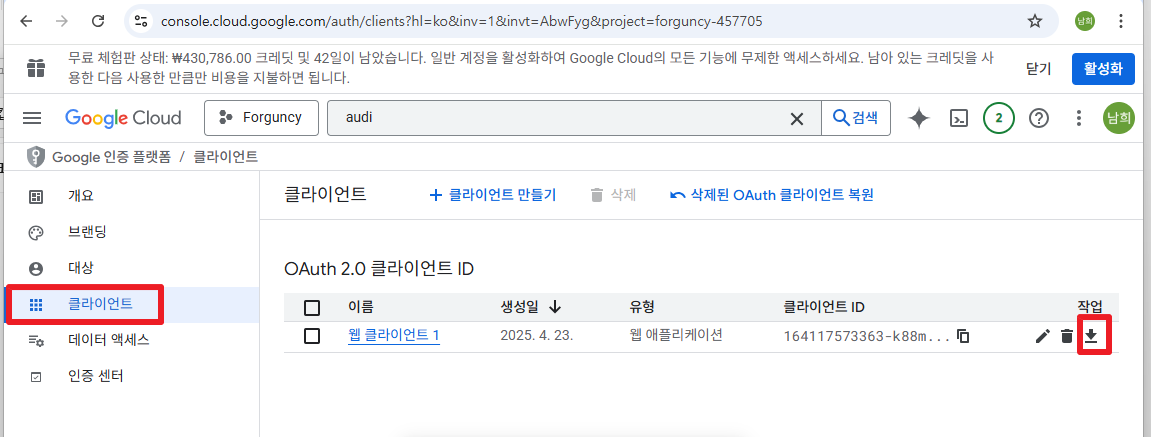
7. 메뉴에서 \[클라이언트]를 선택한 후, 우측에서 다운로드 버튼을 클릭합니다.
![](https://gcdocumentsitekrblob.blob.core.windows.net/document-site-files/images/4e3bfc58-e2a1-41a1-ac75-a0e383260d93/image-25.png)

\[JSON 다운로드] 버튼을 클릭합니다.

![](https://gcdocumentsitekrblob.blob.core.windows.net/document-site-files/images/4e3bfc58-e2a1-41a1-ac75-a0e383260d93/image-26.png)

## 클라우드 스토리지 인증 설정

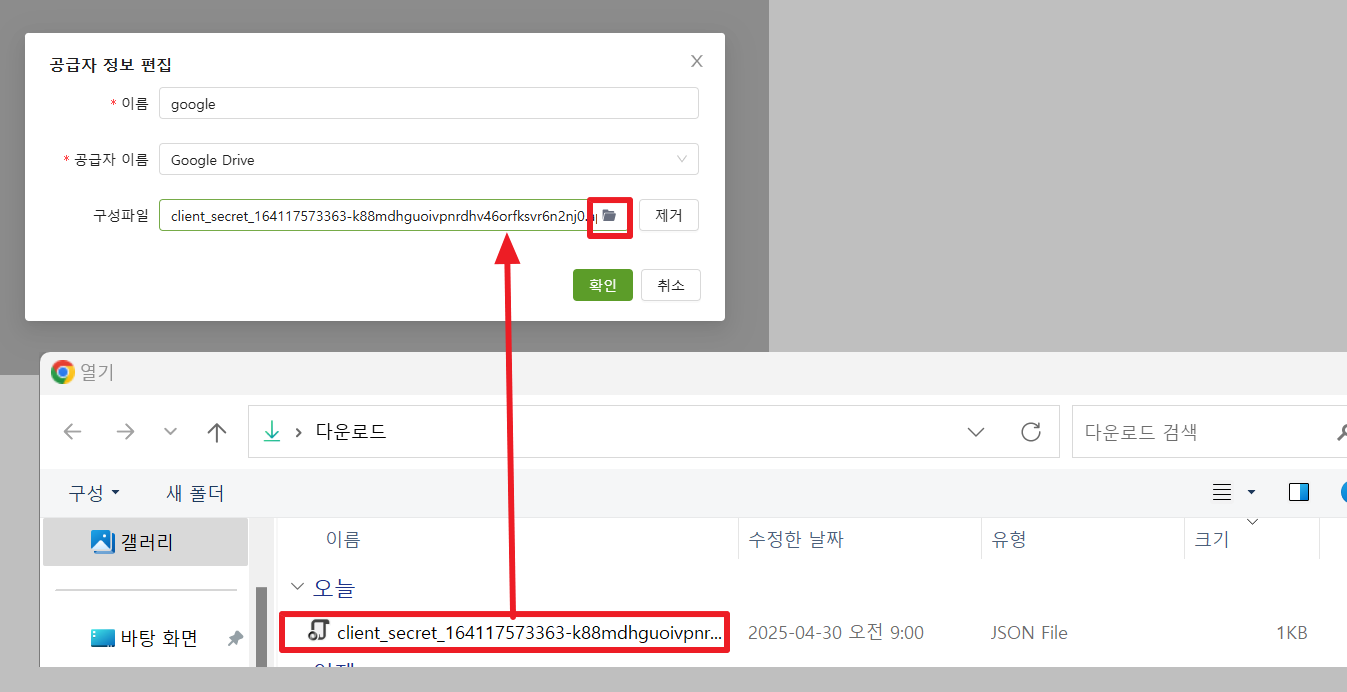
1. 설정>클라우드 저장소 설정>인증설정에서 아래와 같이 설정합니다.\
   구성파일은  구글에서  다운로드받은\
   JSON 파일을 선택합니다.
![](https://gcdocumentsitekrblob.blob.core.windows.net/document-site-files/images/4e3bfc58-e2a1-41a1-ac75-a0e383260d93/image-27.png)

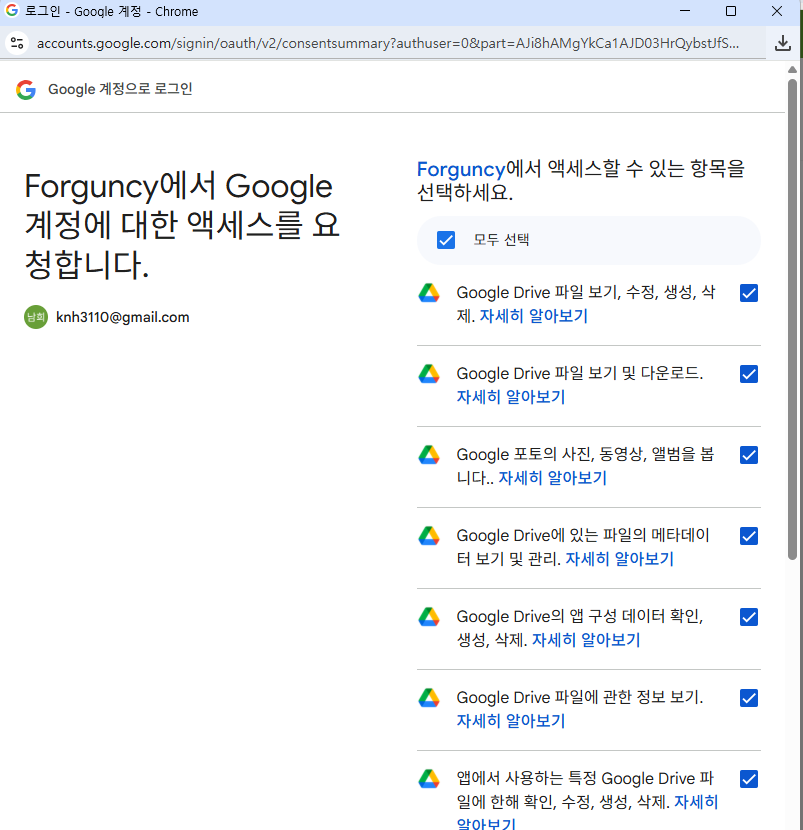
2.  액세스할 수 있는 항목을 선택합니다. 하단에       있는\
    \[계속] 버튼을 클릭합니다. 
    ![](https://gcdocumentsitekrblob.blob.core.windows.net/document-site-files/images/4e3bfc58-e2a1-41a1-ac75-a0e383260d93/image-28.png)

설정이 완료됩니다.