- Forguncy | 포건시
- 시작하기
- 데이터베이스
- 페이지&데이터바인딩
- 웹페이지 구성
-
명령 및 동작
- 명령
- 서버단 명령
- 예약 작업
- 워크플로우
- 로컬 실행 및 디버깅
-
자바 스크립트 프로그래밍
- CSS 사용하기
- JavaScript 사용
- 작업 페이지
- 작업 셀
- 작업 리스트뷰
- JavaScript 및 CSS 코드 디버그
-
JavaScript API 인덱스
- Forguncy 인터페이스
- Forguncy 매서드
- Forguncy 열거형
-
Forguncy 클래스
- CellEvents클래스
- Cell 클래스
- CommandHelper 클래스
- ForguncyCommandHelper클래스
- ListViewEvents 클래스
- ForguncyHelper 클래스
- ListView 클래스
- PageEvents 클래스
-
Page 클래스
- AutoDisconnectTimeout 메서드
- bind 메서드
- getCellArray 메서드
- getCellByLocation 메서드
- getCell 메서드
- getContainerCells 메서드
- getListViews 메서드
- getListView 메서드
- getMasterPageName 메서드
- getPageName 메서드
- getSubPageInfoByPageID 메서드
- getUserInfo 메서드
- getUserName 메서드
- ready 메서드
- recalc 메서드
- reloadBindingData 메서드
- resumeCalc 메서드
- setCurrentRow 메서드
- suspendCalc 메서드
- unbindAll 메서드
- unbind 메서드
- PivotTableCellType 클래스
- PivotTableEventParameter 클래스
- PivotTableHeaderInfo 클래스
- SpecialPath 클래스
- SubPage 클래스
- Page 변수
- 다국어
- 재사용 명령
- 포건시서버
- 배포 및 권한
- 공동작업
- 플러그인
getCellArray 메서드
메서드
Page.getCellArray(name, includeSubPage)
설명
셀 이름으로 셀 인스턴스 집합을 가져옵니다.
매개 변수
| 매개변수 | 형식 | 설명 |
|---|---|---|
| name | string | 셀 이름입니다. |
| includeSubPage | Boolean | 하위 페이지에서 찾을지 여부입니다. 선택적 매개 변수( 기본값은 true)입니다. |
반환 값
예제
다음 예제 코드에서는 getCellArray 메서드를 통해 셀 인스턴스 집합을 가져오고 반환된 셀 인스턴스의 길이를 가져옵니다.
// 현재 페이지 가져오기
var page = Forguncy.Page;
//셀 객체 가져오기
var cell = page.getCellArray("myCell");
//셀 인스턴스의 길이 가져오기
var len = cell.length;
// 셀 인스턴스의 길이를 보여주는 경고 상자 팝업
alert(len);
Forguncy 사용 예제
Forguncy에서 빈 페이지 2개를 생성합니다.
“페이지1”에서 아래와 같이 셀 범위를 선택 > 셀 유형을 “내용이 포함된 셀 타입” 선택 > 하위 페이지로 “페이지2”를 지정합니다.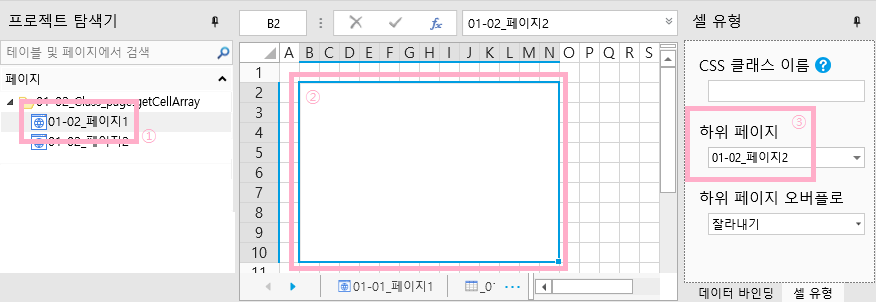
※ 참고 : “내용이 포함된 셀 타입”이라는 셀 유형은 아래와 같은 위치에 있습니다.

“페이지2”로 이동하여 아래 그림과 같이 셀 영역을 설정합니다.
(1) 셀을 병합하지 않습니다. 여러 개의 셀을 선택한 상태로 그냥 두시면 됩니다.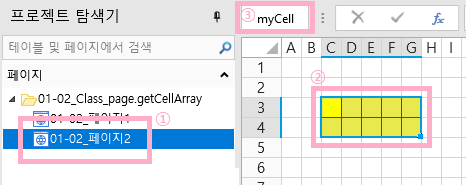
(2) 이후 영역이 선택된 상태에서 좌측 상단에 “myCell”이라고 붙여 줍니다.※ 참고 : ForguncyCell Name과 관련한 사항에 대해서는 별도의 페이지에서 설명합니다.
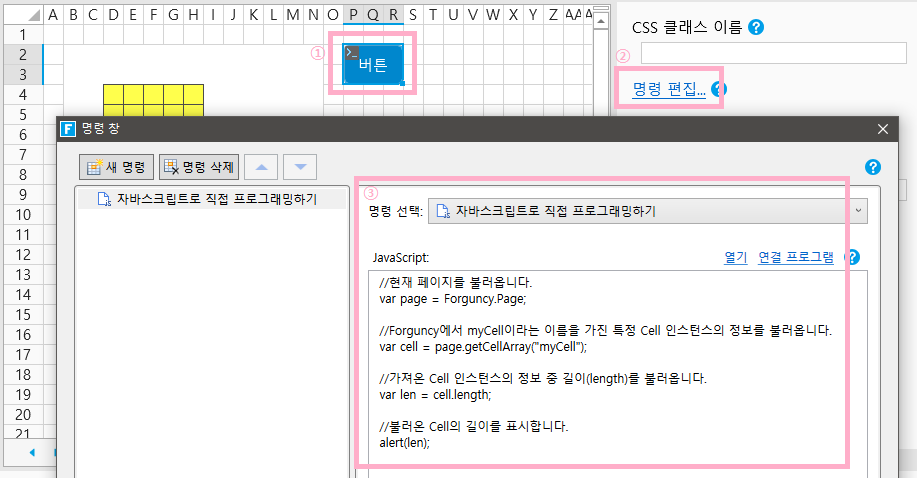
“페이지1”로 돌아가서 아래 그림과 같이 “버튼”을 생성하고, 버튼에 명령을 설정합니다.
(1) 셀 영역을 선택하신 후 셀 유형을 “버튼”으로 선택합니다.
(2) 버튼 셀을 선택 시 우측에 나타나는 패널에 “명령 편집”으로 이동합니다.
(3) “JavaScript로 직접 프로그래밍하기” 명령을 이용하여 스크립트를 작성합니다.
프로젝트를 실행합니다.
웹브라우저에서 아래와 같이 ‘버튼’을 클릭하면, 10이라는 팝업창이 나타납니다.
myCell로 지정된 Cell의 영역이 총 10개이므로, myCell이라는 영역의 길이는 10으로 나타납니다.